The Real Cucina Povera Is Vegetarian

These are salad greens, which are different from cooking greens.

In almost all cooking or travel shows about Rome, “cucina povera” — the poor kitchen, is featured with the host shown noshing at the offal of some animal. Invariably, they will also mention the fifth quarter, the quinto quarto, which is what is left after the other parts were shared between the nobles, clergy, bourgeoisie, and military.
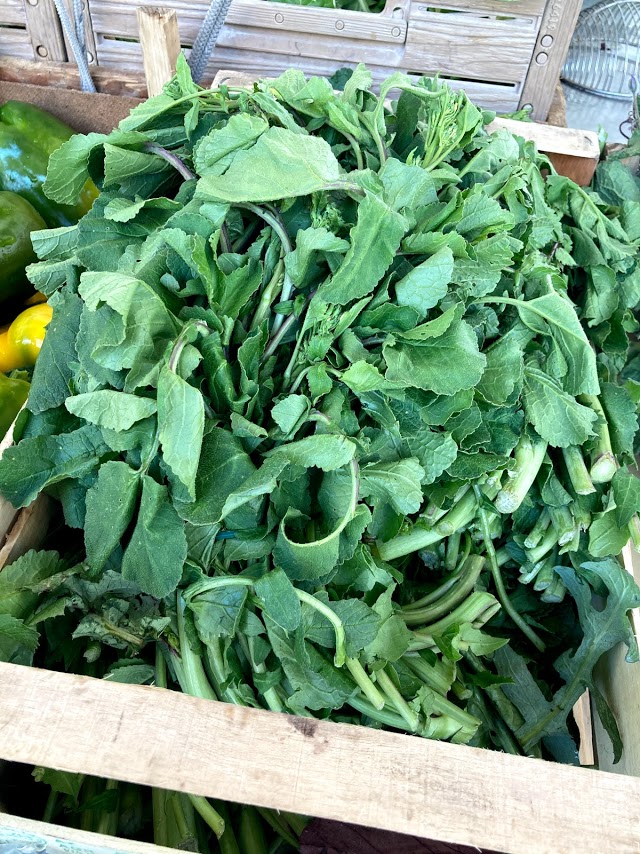
Borage. I think.

What if you were vegetarian? I’m being facetious, because if you are poor, you eat what you can. Most poor people, through history, have been vegetarian. On a side note, the pig is the only barnyard animal that is worth more when dead. Most animals are worth more for their eggs, milk, wool, etc.

Cooked chicory greens. Available every single day.

Italians have been poor for most of their history (from long before there was a nation called Italy — created in 1861) and their cuisine has grown from necessity. As recently as a few generations ago, there were times of famine. Eating offal such as heart, tripe, and other organ meat, would have been rare. The daily food would have been vegetables, bread, pasta, and legumes, such as wild greens and beans. Even today, there are dishes such as puree of fava beans served with chicory greens. Vegetables that would be considered weeds are normal food in Italy. Dandelion and other wild greens that are now on Michelin star menus have been normal food here for centuries. Things like beet tops/greens which would be animal feed in other countries, is normal human fodder.

Dandelion?

Parmesan cheese has over thirty percent protein so it is considered a good source of protein when meat is not available. It is called “the poor man’s meat” or was, but it certainly is not for the poor anymore. Meat is cheaper. There are even recipes that call for toasted breadcrumbs — this was if you could not even afford cheese.

Broccoli greens.

I recently discovered another frugal use of dairy. Ricotta is made from the whey leftover from the making of cheese. In Puglia, they take the ricotta and let it ferment to become “Ricotta Forte” a strong cream cheese product that is picante because its sourness will bite you in the back of the throat. I have not asked but it’s probably “good for you” which normally means they need to convince you to eat it…

Fortunately, there is olive oil. Even the poor can afford it. Italy was a mostly agricultural society and even today there are many small farmers. Many big city families still own an olive tree orchard and produce their own olive oil each year.

Today is mother’s day in Italy, but really, every day is mother’s day in Italy. While men are often the famous chefs, it’s the mothers who do the majority of the cooking. They can even turn weeds into comfort food.
Recipes from the Cupboard: Spinach Parmesan Dip

Just like those shows where one has to make a recipe based on unknown ingredients, cooking at home during the time of COVID, is like. I had forgotten how creative cooking really can be. At the start of the ‘stay home’ time, I organized my food by expiration date. I have been eating it in that order, sort of (sometimes instant noodle is just the fastest way to get some food made). But, as my local kiosk, bodega, has a daily supply of onions, tomatoes, potatoes, bananas, and ready made meals, some days, I’ve made brunch (eggs, potatoes, and toast, or French toast with home fries).

Many years ago, people asked me to write a cookbook. I don’t like measurements and have never really measured except when baking. I include here a basic recipe for spinach Parmesan dip. It’s cooking without a recipe but try it! For measurements, I would just go by eye (or gut!). Or google it (I did not invent this recipe).

Cream cheese

Spinach (chop it and make sure to squeeze the liquid out of it)

Parmesan

Mayonnaise

Add garlic, cayenne, chili, paprika, pepper to taste.

Mix it all and bake in oven until golden brown.

For those who live in the U.S., these are all ingredients that they most likely have at home.

When done, place in good north light and photograph in an artsy manner before eating.

Recipe for How to Make Chicken Causa

XU3avk8OGYzE2BvymEO0cqX7JC3EApteoULsKRp-swftCuO1LQVh8PznHyIB_0tFW5GSJK_G4u-a23MFnOx51aFsQpS9iT7HyKDke133bCBpOKF5LDeKv_PRHA4P2hIJ-tD_Yll44odUhZ2nqvebbp_uCAgvR6bO4954dd0_jELqrelMsvFin--BBH30ObT7Iz0GrWBVTT5xjbHa7kcH-BI_TYMqo0bA classic potato dish in Lima is “causa” which translates as the “cause” or fight.  But, it can also mean “buddy.”  I took some photos while a buddy of mine and her mom made “artisanal” causa… as in homemade (which is one of the points that mega-phone of Peruvian cuisine, Gaston Acurio champions, although you can follow his recipe here). It took them more than three hours.  Here is the recipe (sort of) as the grandma making the dish doesn’t use measurements (hence the artsy part of this) and it took so long that I went off to take a nap.

uz3g1XgDc1BZWt3I3c41Q1FNkD3_rx9Gso_XNPxeQ1GU0UkV50Wk9zXxcVxMGwLstDEqeCHBFZ_xAzXFRqrppeLa6M20ApAihFIsesPp90oTe5O0YDbFjMzYv2l9ZNZTLjzcYBvI6rH2TVDx7XWtv6bxaSKbbX8FFu_W_E2auGnaVzoTM1HPfJ5RQxM9A_Ayz5r2hcNDTWDJPJtDV-Y8MaK4s2CMXqq4 large chicken breasts

24 large Peruvian Yellow potatoes

a cup of celery

a large carrot

2 white onions

yellow Peruvian chili paste

salt & pepper

2 avocado

4 tomatoes

red pepper

parsley

pitted black olives_r28rWipYbntM2Wedzah4-nuDSIOSmPE7bkk-Z5cGSeYO5FsWPvCCLf1CP3-40ktHh6mWUYJ3ylxrL5raKV7J2YQuFH9loyCGA7w6aAr7EpX24K5p_EcXgqThaT5Inr2vZoLmW_5unFCH4T0_WCIw8oNfpMIJiDmhsa135T2VQiSrMtsLua6goo60Yu8bxKMNn0sDqXqi1DPJQ-UCWSI-zYq9TM5_gI

  1. Cook the chicken in water with chopped onion, celery, and carrot, and a pinch of salt (large pieces are fine). Boil until chicken breasts are cooked (40 minutes). Pull out chicken breasts and let cool.
  2. Boil yellow potatoes. When boiled, drain and peel as soon as you can as the peel is easier to remove when the potato is hot.
  3. Remove the strings off the celery and chop very fine.
  4. Chop half a white onion very fine.
  5. Chop/pull the cooked chicken breast.
  6. Mix the chicken meat with mayonnaise, salt, pepper, onions, and celery.
  7. Crush by hand the cooked and peeled potatoes. Crush until they are smooth and have a creamy texture. Add olive oil, salt, pepper, lime juice, and chili paste. Keep tasting it until it tastes right.
  8. In a large lasagna pan (or use a glass, whatever), build your causa. Bottom layer is potato, then the chicken salad, then avocado, then tomato, and then another layer of potato. Use a fork to make a design on the top and decorate with parsley, red pepper slivers, and black olives. Eat straight away or keep in fridge until it “settles” and gets even tastier.

EKsqBPiV_FTcNBYX9aRQnk02n7LKbEFZIvmo87qWEjO5Es4qDmYY4RAREOhPDEjuOI7qMdER6VbrcK8in88q2x27oa4zcGMfgZz_78eQ21Pe-5yAP9y9soVaPg0uYz1iVL54n9GQZSJrRu4DnH3PXS5ighTHF9LvCHIQ6ntXAhl3KAWvmzNS-bSAiIk2H6ZRgnFcAS1w21sCu4bswRE_MsWZjlIHGaTThere are other types of causa with crab, shrimp, egg, but chicken salad is typical in Lima. The Lima thing to do is to eat this as an appetizer and then follow with “aji de gallina” which is rice with stewed chicken, another classic dish from Peru.


Cheesecake Recipe from King Arthur

z3rihusRpSnpD2mnBIthGTHDV6i4Wex565rojIGlmjegFmsjmCZSwaJjcYXerb2HcQQywPeJR_0KYe5qCXBqQyoBsOTojfCk0drquPbYLbpIg0uCX0FyTVRzUIcQigVAwIM90e826K1H_H1ZuxbN0qxDM9a8Qxb2m1wed0oXONHiOlHgu7FFTaSPDlAs obsessions go, cheesecake is not one of mine. But, recently, I had a cheesecake that I actually liked. Here is the recipe from King Arthur’s Flour. I encourage you to read it out loud so you can enjoy saying “zwieback” — just because. Also, for the optional topping, I would simply cook some fresh berries with a bit of sugar. Keep it simple. Or serve fresh berries and not bother with making a sauce.

Crust

  • 1 1/2 cups graham cracker crumbs OR zwieback crumbs
  • 1/4 cup confectioners’ sugar
  • 5 tablespoons + 1 teaspoon (1/3 cup) melted butter
  • 1/8 teaspoon salt

Filling

  • 2 cups (2 large packages) cream cheese, at room temperature
  • 2 large eggs
  • 2/3 cup sugar
  • 1 teaspoon vanilla extract

Topping (optional)

  • 12 ounce bag frozen raspberries, a scant 3 cups
  • 1 to 3 tablespoons sugar, to taste
  • 1 to 2 tablespoons Pie Filling Enhancer; use 1 tablespoon for a looser sauce, 2 tablespoons for thicker
  • pinch of ground cinnamon, optional

Instructions

  1. Select a pie pan whose inside top dimension is at least 9″, and whose height is at least 1 1/4″. Preheat the oven to 350°F.
  2. Make the crust by stirring together all of the crust ingredients, mixing until thoroughly combined.
  3. Press the crumbs into the bottom and up the sides of the pie pan, making a thicker layer on the bottom than on the sides.
  4. Make the filling by mixing together the room-temperature cream cheese and sugar until smooth. Mix in the eggs and vanilla, again mixing until smooth. To avoid beating too much air into the batter, use a mixer set at low-medium speed. To avoid lumps, make sure the cream cheese is softened, and/or at room temperature.
  5. Set the pie pan onto a baking sheet, if desired; this makes it easier to transport in and out of the oven, and also protects the bottom of the crust from any potential scorching. Pour the filling into the crust.
  6. Place the cheesecake in the oven. Bake it for 20 minutes, then add a crust shield; or shield the crust with strips of aluminum foil. Bake for an additional 10 minutes (for a total of about 30 minutes). An instant-read thermometer inserted into the crust 1″ from the edge should read between 165°F and 170°F; the filling won’t look entirely set in the center.
  7. Remove the cheesecake from the oven, and set it on a rack to cool while you make the topping. Once the cake is cool, refrigerate it, covered, until you’re ready to serve it.
  8. To make the topping, place the frozen raspberries in a bowl to thaw. You can hasten the process with a quick trip through the microwave, but don’t let the berries cook.
  9. Add 1 tablespoon Pie Filling Enhancer, and stir until well combined. Is the topping as thick as you like? If not, stir in another tablespoon Pie Filling Enhancer.
  10. Add 1 to 2 tablespoons granulated sugar, to taste. Stir in a pinch of ground cinnamon, if desired.
  11. Spoon the topping over the cheesecake, and cut slices to serve. Alternatively, cut slices, and top each with a dollop of topping.

Cucumber Kimchi – It Is Really Easy!

Thanks to Paloquemao market, I’m able to find “Asian vegetables” to make Asian food. This includes kimchi.

Cucumber kimchi in pride of place on the table.

In Dhaka, I organized Korean cooking lessons and it was possible to buy Korean goods at the Korean mart in Dhaka (and I had my special Korean place in Dhaka to supply me). In Bogota there is no Korean supermarket with ready-to-eat small dishes (other than Maki Roll restaurant which has a few items for sale). Also, I haven’t found my kimchi source (Casa de Coreana‘s is the best in Bogota, in my opinion), so I decided that I would have to make it myself.

Hand made cucumber kimchi.

The recipe is easy to find on the Internet (Maangchi is one of favorite) and I used her easy recipe involving fish sauce. I made it and it was delicious!

Cucumber kimchi made by me.
Cucumber kimchi at six hours old.